Field Testing Gold Ore Part 2
The Basic Field Equipment Needed
By Kerby Jackson
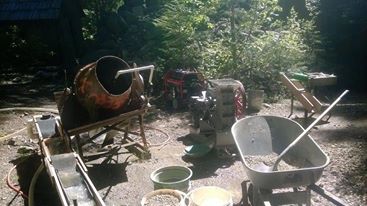
If you missed part 1 CLICK HERE. As mentioned earlier, one of the first reactions of those who become interested in lode mining is to rush out and put some sort of mill together. Similarly, many miners put off becoming serious about prospecting for gold ore on the grounds that they don’t own and can’t afford milling equipment. Though small test mills are certainly handy to have if you process a lot of samples like we do in our day to day sampling operations, in truth, until you’ve actually discovered and thoroughly prospected a free milling ore body to “prove it up”, a mill is not a necessity and it could even be a very poor investment on your part due to the fact that it may sit and rust in your backyard before you find anything worth feeding to it, let alone of a volume enough to justify the investment. I could introduce to many people who’ve invested tens of thousands of dollars into milling or related equipment that have yet to produce a single ounce of gold due to the fact that they actually had no viable ore to run.
In truth, only a few basic and very affordable tools are needed to prospect for free milling gold ores. These include a good metal handled shovel, a good rock or geologist’s hammer, a jeweler’s loupe, a gold pan, a 20 or 30 mesh classifier, snuffer bottle, shatterproof gold vials and a good mortar and pestle. Add to this, a notepad, something to write with, a compass, some flagging tape or surveyor’s flags, relevant topographical and geological maps of the area, a hard hat with miner’s light and some sample bags and you are pretty much set. Other equipment such as a GPS device and any good metal detector or similar electronic equipment specifically designed for finding gold would also be handy too and serve you well, even though they are not 100%
necessary. These days, smart phones can replace a lot of these essentials since you can get applications for maps of all kinds, GPS and compass features, but some of us are still so “old school” that we resist using them. A good sidearm, particularly a revolver in a good caliber, with some extra ammo, is also a good tool to carry, for you never know if you’ll encounter a need to protect yourself from four legged or two legged vermin in remote mining country. For the best results, you want to fit your entire kit in a small lightweight backpack and on a belt and to choose equipment, perhaps with the exception of your shovel which needs to be pretty durable, that are as lightweight as possible. Also needed are whatever supplies you may need personally for sustenance and sanitary or other personal needs, in accordance to however long you intend to be in the field, and maybe a little extra for “just in case” should also be considered. A small first aid and survival kit also rounds out the necessities. In snake country, a snakebite kit should be included. You don’t want to be without if you happen to need these types of items in an emergency.
If headed into dry country, a second large gold pan to use as a portable panning tub and a gallon or so of water to fill it may also be needed.
As can be easily understood, even these basics can add up to a considerable amount of weight to carry around all day. For this reason, as well as for emergency preparedness, many prospectors have developed the habit of creating supply caches in various locations that they tend to frequent regularly. These include items like extra shovels, picks, pans, classifiers, buckets, sample bags, batteries, ammunition, canned food, fireproof matches, survival gear, tarps, rope, axes, etc. that may be needed. Great care should be used in choosing the location of such caches, as well as in securing them against the weather, wild animals and the risk of theft by other parties.
The Mortar & Pestle, the Rock Hammer and the Pan

Your mortar and pestle, rock hammer and your pan are the most important items in your field kit, for they are the tools with which you will collect and process your ore samples. In truth, all other gear in your kit is secondary to them, so a little should be said on the subject of these tools.
Little needs to be said about rock hammers, beyond the fact, that for the best result, a lightweight model is best for field work due simply to its weight of regularly wielding it and needing to pack it. It is best packed in a holster designed specifically for it, on your belt, where it is within easy reach of whichever hand you use it in. Above all else, the pointed end, which is used to chip out ore samples should be kept sharp by grinding it back to a point whenever use has rounded it off.
Almost every miner has their own preference for gold pans. I personally prefer the Falcon clean-up pan for concentrating ore samples due to its broad base, light weight and its ability to recover fine gold, as well as the fact that its size compliments my one-handed panning style. Others prefer the large pans with the riffles, old fashioned steel pans or whatever strikes their fancy and almost everyone has their own theory on pan color. Whichever your personal preference in pans, for the best results, choose a pan that either fits in your pack or drill a small hole in one edge of so that it can be attached to your pack by use of a lanyard or light cord, to avoid of carrying it everywhere in your hand. Above all else, choose a pan with a wide base opposed to a narrow one, as these wider base pans allow you to process a bigger sample at a single time due to holding more volume.
Where the mortar & pestle is concerned, as much as it might appeal to you because of its handiness, your wife’s nice silver, wooden or marble mortar and pestle that she uses to grind up cooking herbs is not the best choice for prospecting. In addition to getting on her bad side quick when she finds out you’ve borrowed it to crush up rocks, these types of mortars are not durable enough to withstand the rigors of field testing. For the best result, choose a mortar and pestle designed for crushing small ore samples. Invariably, most of the commercially manufactured ones designed for mining are cast iron. Though a large one that can process a larger sample might at first seem very appealing, they will be found to be very heavy and will add considerable weight to your field pack. These are, in truth, actually designed more with lab work in mind than actual prospecting. With that in mind, the smaller and much lighter model is the best choice for field work, even though they still weigh several pounds.

Many prospectors also make their own mortar and pestles out of pieces of metal plumbing pipe with a metal cap on the end, accompanied by a piece of rebar or metal rod. Though they do work and are often more transportable due to their lighter weight and smaller size, it will be typically found that their capacity is lacking and that they are less efficient than the heavier field mortars still sold in mining shops or occasionally in antique stores in the case of an old one. The choice is yours: light weight over effectiveness.
It should be added, that in a bind, it is possible to crush up an ore sample in the field utilizing your rock hammer and a shovel. The ore is simply broken up into small pieces with the rock hammer and is then placed on the concave side of the shovel. The curved edge of the top of the rock hammer is then applied against the ore fragments and the handle rocked back and forth against the rock in such a way that it pulverizes it into powder. Though not as fast or efficient as an actual mortar and pestle, it works if one has forgotten to bring their mortar or wishes to lighten up their pack a little on a longer hike by leaving their cast iron at home on this trip.
